USING RUBBER - SOME TIPS FOR MAXIMUM PERFORMANCE - PART 2
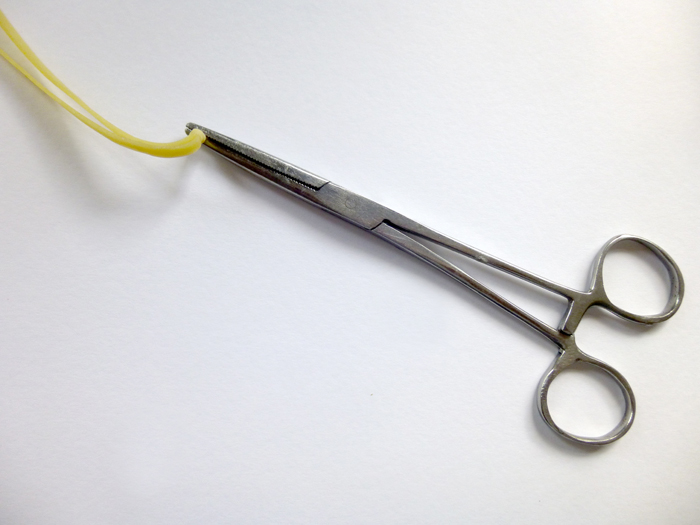
The best way I have found for tying knots in motors is shown in the photo above left. I clip the two ends into the pair of cheap forceps (from Proops or similar), locking the forceps. I lube the motor and then tie a simple overhand knot going left to right.
I pull that very tight and then tie another overhand knot right to left, pulling that tight down onto the first knot. If you really want belt and braces, you can dip the knot into anti silicone non slip powder from Mike Woodhouse, but I have rarely had a knot come undone tied this way. It is also very quick.
4 - TORQUE VERSUS TURNS
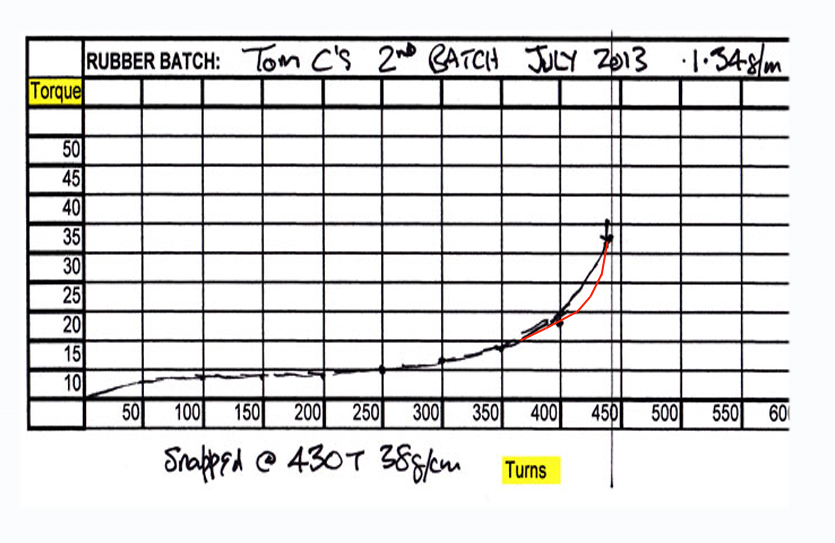
This is perhaps the most neglected area when it comes to getting the best out of a specific piece of rubber. Most fliers (including me until I took up F1D) believe that the factor which determines model performance is simply how many turns you can pack onto a motor. So what tends to happen is that they use a bigger motor than is neccessary and then pack on the turns. They watch the model shoot up to the roof and think that they are getting a good flight. They don't appear to notice that the model comes down equally quickly once the turns have spun off very fast. You can actually get a much longer time by winding up fully and then winding off some of the turns to reduce the initial torque. This can be a puzzle. How can you get more by taking turns off? The answer lies in understanding how rubber behaves when it is wound and when it unwinds.
The first thing to note is that height is controlled by launch torque NOT turns. You can put a lot of turns on a thin motor, but it won't climb as high, or as fast as a thicker motor. Great... but a thicker motor spins turns off very quickly .. very spectacular, but usually results in slamming into the girders. Very wasteful of energy. The graph shown above is an actual test result. The red line shows how the rubber UNWINDS compared to the torque when it is wound. You can see that by backing off about 25 turns, the portion of the run from 400 down to 10 turns is much more useable and controlable as it isn't so fierce. The extra duration comes from not spinning turns off quite so quickly.
What I do is to work out what launch torque is needed for a given model in a given hall (usually about 25g-cm for an F1D. I wind FULLY and back off to that launch torque. If you watch my models, you will see that I usually manage to get them to within inches of the beams without touching. Crucial for competitions, but also saves having them damaged by rattling around in the metalwork, whatever the type of model. It also makes the model easier to trim as the initial torque isn't so high.
So... you are going to need to make a simple torquemeter!! Mike Colling (a NORWIND member) makes a kit, but all you need is a bit of wire, a bit of plastic or aluminium tubing, a peanut nosebush and a few bits of wood. Mine isn't fancy, but it works perfectly. See the next page....
I pull that very tight and then tie another overhand knot right to left, pulling that tight down onto the first knot. If you really want belt and braces, you can dip the knot into anti silicone non slip powder from Mike Woodhouse, but I have rarely had a knot come undone tied this way. It is also very quick.
4 - TORQUE VERSUS TURNS
This is perhaps the most neglected area when it comes to getting the best out of a specific piece of rubber. Most fliers (including me until I took up F1D) believe that the factor which determines model performance is simply how many turns you can pack onto a motor. So what tends to happen is that they use a bigger motor than is neccessary and then pack on the turns. They watch the model shoot up to the roof and think that they are getting a good flight. They don't appear to notice that the model comes down equally quickly once the turns have spun off very fast. You can actually get a much longer time by winding up fully and then winding off some of the turns to reduce the initial torque. This can be a puzzle. How can you get more by taking turns off? The answer lies in understanding how rubber behaves when it is wound and when it unwinds.
The first thing to note is that height is controlled by launch torque NOT turns. You can put a lot of turns on a thin motor, but it won't climb as high, or as fast as a thicker motor. Great... but a thicker motor spins turns off very quickly .. very spectacular, but usually results in slamming into the girders. Very wasteful of energy. The graph shown above is an actual test result. The red line shows how the rubber UNWINDS compared to the torque when it is wound. You can see that by backing off about 25 turns, the portion of the run from 400 down to 10 turns is much more useable and controlable as it isn't so fierce. The extra duration comes from not spinning turns off quite so quickly.
What I do is to work out what launch torque is needed for a given model in a given hall (usually about 25g-cm for an F1D. I wind FULLY and back off to that launch torque. If you watch my models, you will see that I usually manage to get them to within inches of the beams without touching. Crucial for competitions, but also saves having them damaged by rattling around in the metalwork, whatever the type of model. It also makes the model easier to trim as the initial torque isn't so high.
So... you are going to need to make a simple torquemeter!! Mike Colling (a NORWIND member) makes a kit, but all you need is a bit of wire, a bit of plastic or aluminium tubing, a peanut nosebush and a few bits of wood. Mine isn't fancy, but it works perfectly. See the next page....

Tying knots in motors
Harlan Rubber Stripper