
USING RUBBER - SOME TIPS FOR MAXIMUM PERFORMANCE - PART 3
4 - MAKING AND USING A TORQUEMETER
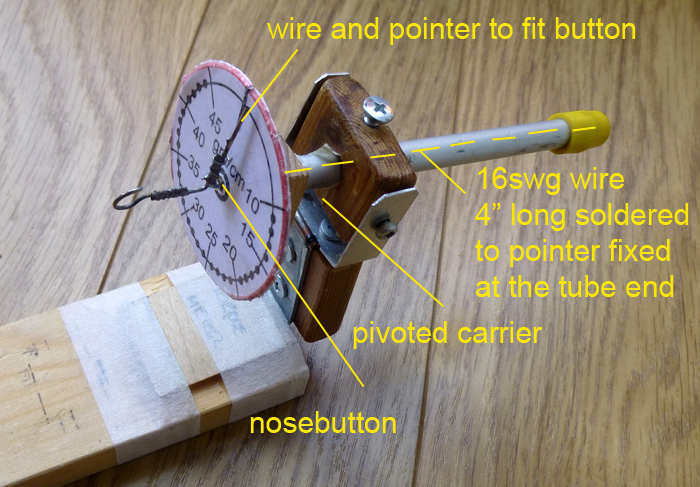
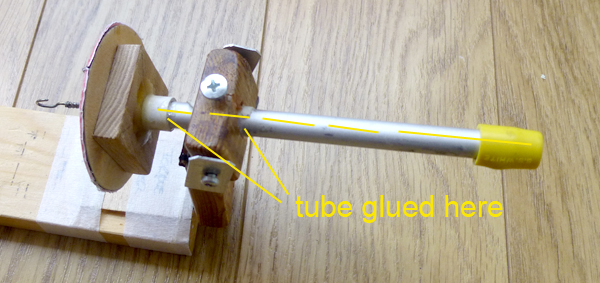
Although it helps to have an accurately calibrated torquemeter, it isn't essential. What matters is that YOU have some reference point which enables YOU to set the torque level you want. The only real value of an accurate one is that you can compare results with other fliers. My torquemeter is shown below, along with the dial I plotted. Mine is measured in Gm -cm, but they use oz-ins in the USA. You will see that it isnt complicated. My dia is 2" in diameter and is printed out, stuck on 1/16" ply and covered with stickyback plastic. I have shown an accurate dial and an "open" dial. The scale shown on the accurate dial will be about right if you make the 16swg torsion wire exactly 4" long from the rear fixed point to the soldered joint on the pointer. Mine was calibrated with a drum and gram weight suapended on a thread, but most people only need something that they can use to give a relative consistent torque measuremen for themselves. The units don't matter unless you REALLY want to compare with othe fliers. My nosebutton is a an old rubber nosebearing. A Brass bush and washer would do. The more friction free, the better. I have cyano'd a lead weight at the bottom of the carrier to keep the meter balanced and level.
When you use the meter, the reading is affected by the pull on the motor, so I set my setup to read at the final distance between the motor hooks on the model. To use the meter, check the motor for nicks and ensure that it is lubed. Pull the rubber out until it feels hard. Wind SLOWLY (heat makes rubber go bang!) giving a slight tug every few winds. Wind to about 80% of the estimated turns, hold it for half a minute and then unwind it it. This will "break in" the motor. Leave to rest for 20 minutes and then wind for real. IF the torque goes down when you return to the original position after tugging, wind on a few more and try again until it stays at the torque when the tension is reduced. Start to come in slowly, winding on a few more until it begins to feel hard. Be very careful to watch the meter at the end. When it gets near to breaking, the meter will go up a lot with each turn. Make sure that your motor is at the same distance as the distance between the model motor hooks and wind off about 5% of the turns, or to the required torque if you know it.. Fly the model and see if you have got the height right.
NB I make a small test sample motor for any given size (about 15cm), break it in by winding hard. Leave for 20 mins and then wind to breaking point, carefully noting the turns. You can then work out a rough turns per cm breaking estimation. Keep a note of these tests for future reference. I often see fliers massively underwinding because they have no idea what a particular motor will take. Most motor will take repeated winds to 80% max if given a rest between winding and no nicks.
5 - PARTIAL MOTORS AND BALLAST
Partial motors are useful for keeping times down when we only have a limited time for competitions. They are also useful for making precious rubber go much further. I'm sometimes asked why we don't just put less turns on, or back off more to keep times down. the answer is that you can't really trim a model fully unless it is fully wound to higher torque levels. A model of any type which is normally flown on half turns for sport flying will produce trim problems when suddenly wound up a lot more for a competition. You will never know its real capabilty and you won't notice the motor getting tired over time.
Partial motors require a spacer which is equivalent to the length required to make up the difference between the partial motor length and the total distance between motor hooks on the model. eg, a 50% motor will need a 50% spacer (in weight) to maintain the full length motor requirements. For NORWIND Penny Plane, we use a .75g motor and a .75g spacer which is roughly half the length of the distance between motor hooks. A little bit of latitude in spacer length is allowed for different motor thickness. In some competitions (such as F1D at the Velodrome, the spacer length will be stipulated more precisely, so you need to check the requrements before you go). This is because model performance can be enhanced with different spacer lengths and the aim is to simply replace a full size motor directly with a partial one without altering the model characteristics. Spacers can be made of wire, carbon rod or bamboo with a hook at each end.
I make mine from stripped bamboo (wooden skewers from Tesco). Bamboo is very light, strong and can be easily scraped or sanded down to exact weight. I use short, .016" guitar string wire which has the non-hook end bent to 90 deg and pressed into the bamboo. The hooks are then bound to the bamboo by wrapping with Kevlar or cotton thread and cyano'd in place.
I hope this has been useful - copyright Tom Tomlinson
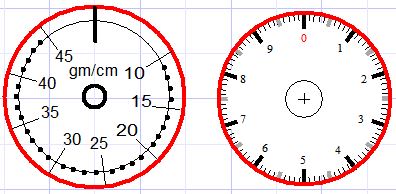
right click on the dials to download the full size print which should measure about 2" diameter.